Install MyAgentOS on Windows (self-hosted Docker edition, beta)
Install WSL2 and Docker Desktop, download the signed image, run two commands, and open the dashboard on your own PC at
localhost:3002.
MyAgentOS runs on Windows as a Docker container: one image, one data volume, one
port on your own machine. It is the same signed build we test on the Mac and in
the cloud, packaged for Docker. It runs inside a VM-backed container, so the
boundaries are worth stating plainly before you start: the dashboard listens on
127.0.0.1 only, so nothing else on your network can reach it; every request
needs your token; the container cannot see your Windows files unless you mount
them yourself; and a fresh install holds no email or messaging keys, so nothing
can send anything on your behalf until you add keys.
Who it is for: Windows 10 or 11 users on the beta programme who are willing to install Docker Desktop and paste a few commands. You do not need to know Docker. If you would rather not run Docker at all, the hosted product is the better fit: we run it, there is nothing to install. Join the waitlist on the homepage.
If you have run OpenClaw on Windows before: OpenClaw's official Windows path is WSL2, and this is that same runtime with the assembly, upgrades, gateway and dashboard already done inside one signed image.
Prefer to watch? Connecting your AI covers the provider step as a narrated video; the narration is an AI-generated voice.
About the filenames below: the commands name the build current at the time of writing (version 1.0.57). The early-access page always carries the current filenames and the current published checksum, so copy from there if what you downloaded is named differently.
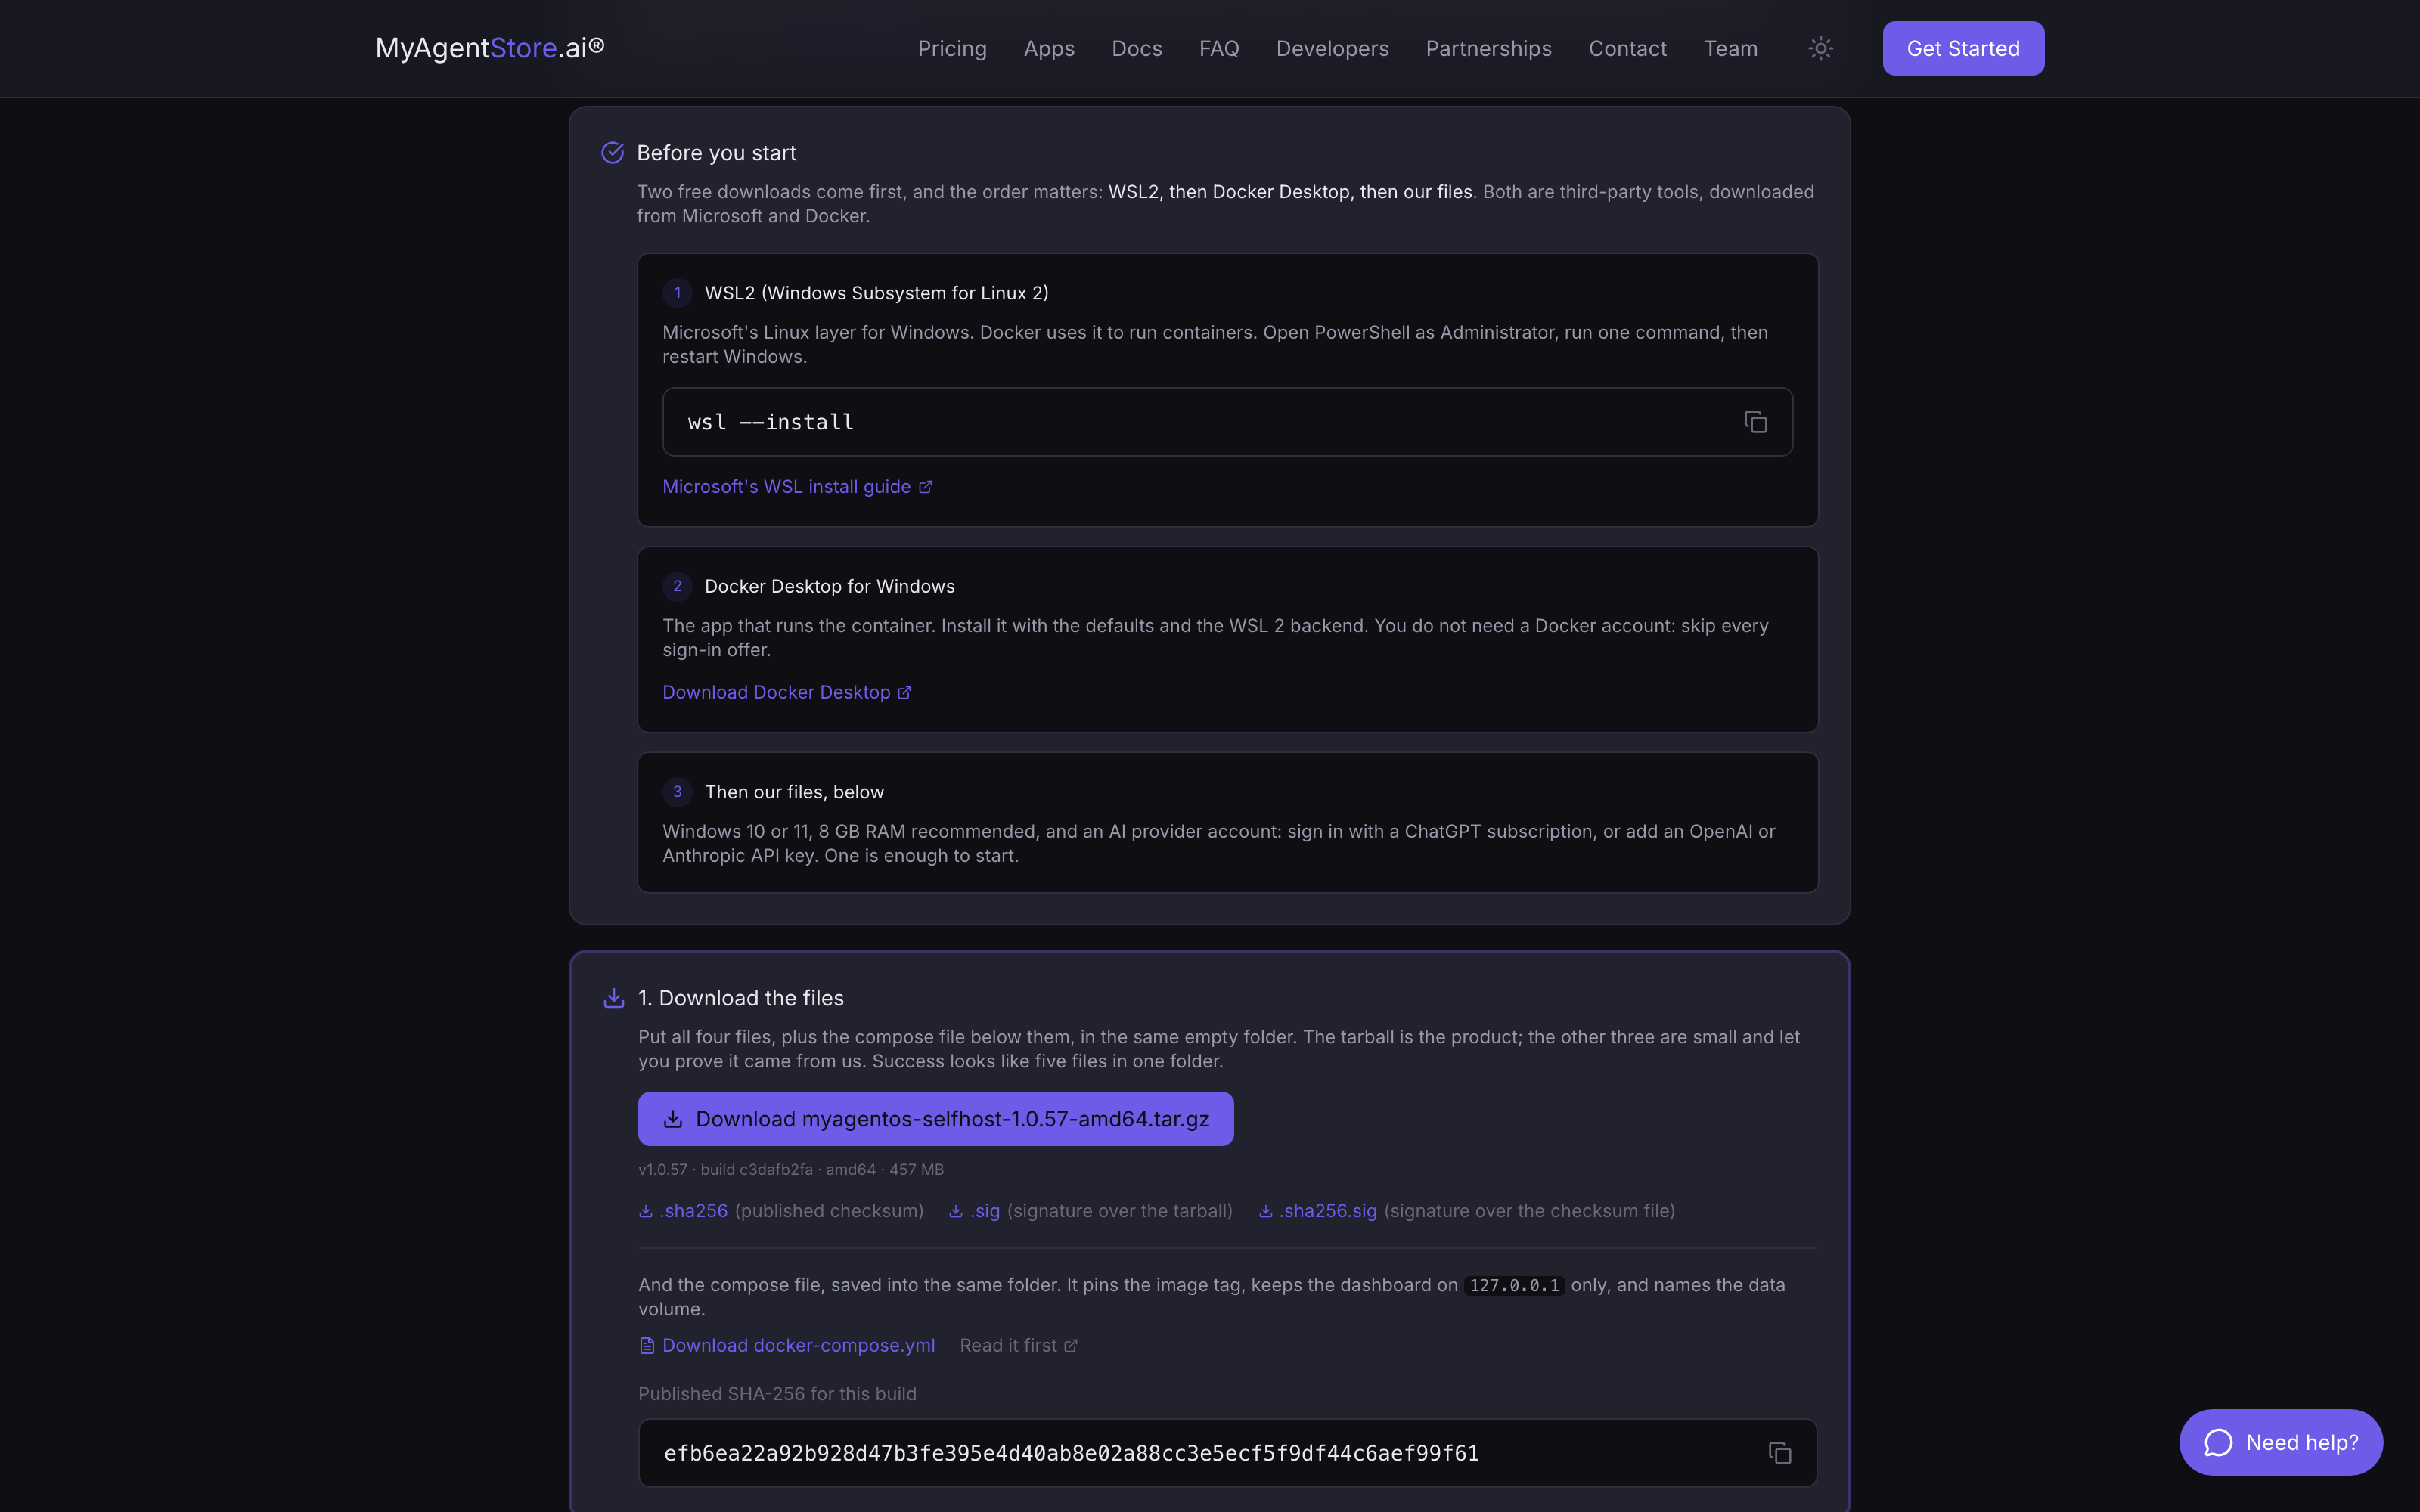
Before you start
Two free third-party downloads come first, and the order matters: WSL2, then Docker Desktop, then our files.
1. Windows 10 or 11, with 8 GB of RAM recommended.
2. WSL2 (Windows Subsystem for Linux 2). Microsoft's Linux layer for Windows; Docker uses it to run containers. Open PowerShell as Administrator, run the command below, then restart Windows.
wsl --install
Microsoft's own instructions are at learn.microsoft.com/windows/wsl/install.
3. Docker Desktop for Windows. The app that runs the container. Install it from docker.com/products/docker-desktop with the default settings and the WSL 2 backend. Skip every Docker sign-in and account offer. You do not need a Docker account for any of this.
4. An AI provider account. Either a ChatGPT subscription (which signs in through Codex) or an Anthropic API key. One is enough to start.
1. Download the files
Get the beta code from your invitation email, unlock the early-access page, and go to the Windows (self-hosted Docker) section. Keep the code to yourself: it is not something to paste into a forum, a screenshot or a support ticket.
Download five files into one empty folder:
myagentos-selfhost-1.0.57-amd64.tar.gz, the product itself (about 457 MB)myagentos-selfhost-1.0.57-amd64.tar.gz.sha256, the published checksummyagentos-selfhost-1.0.57-amd64.tar.gz.sig, the signature over the tarballmyagentos-selfhost-1.0.57-amd64.tar.gz.sha256.sig, the signature over the checksum filedocker-compose.yml, which pins the image tag, keeps the dashboard on127.0.0.1only, and names the data volume
Success looks like: five files sitting in one folder, and nothing else in it.
2. Check your download is genuine (optional, recommended)
Every release is signed with our release key. Verifying takes about thirty seconds and proves the file came from us and arrived intact. You can skip it: nothing later depends on it.
You need OpenSSL, which Windows does not ship. The simplest way to get it is Git Bash. Open Git Bash in the folder holding your downloads and run the three commands below.
a. Save our public key. This is our stable release key; it does not change between releases, and the same key ships inside the release so you can verify future updates offline.
cat > myagentos-release-pubkey.pem <<'EOF'
-----BEGIN PUBLIC KEY-----
MCowBQYDK2VwAyEANducB8BvC5UGleyA3zrqOH790qKF/HfJJRG8laXiVow=
-----END PUBLIC KEY-----
EOF
b. Check the signature. Expect Signature Verified Successfully.
openssl pkeyutl -verify -pubin -inkey myagentos-release-pubkey.pem \
  -rawin -in myagentos-selfhost-1.0.57-amd64.tar.gz \
  -sigfile myagentos-selfhost-1.0.57-amd64.tar.gz.sig
c. Check the checksum. Expect
myagentos-selfhost-1.0.57-amd64.tar.gz: OK. This command reads the expected
value out of the .sha256 file you downloaded, so there is nothing to type by
hand; the published value is also printed on the early-access page if you want to
compare it by eye.
shasum -a 256 -c myagentos-selfhost-1.0.57-amd64.tar.gz.sha256
If a check fails, do not install the file. It means the download was corrupted or the file is not ours. Delete it and download again from the early-access page. If the second download fails too, email support@myagentstore.ai before going any further.
3. Load the image into Docker
From the same folder, in PowerShell or Git Bash:
docker load -i myagentos-selfhost-1.0.57-amd64.tar.gz
What it does: unpacks the downloaded file into Docker's own image store. It takes a minute or two on most machines and looks frozen while it works. Leave it alone.
Success looks like: it prints Loaded image: myagentos-selfhost:1.0.57.
4. Create and start the container
Still in the same folder:
docker compose up -d
What it does: reads docker-compose.yml, creates the container and the
myagentos-data volume that holds everything you do, and starts it in the
background.
Success looks like: docker ps lists a container named myagentos whose
status reads healthy within about thirty seconds. It may say
health: starting for the first minute; that is the container completing its own
checks.
5. Open the dashboard
Open http://localhost:3002 in a browser on the same PC.
That address is your own machine, not our servers. First boot takes a minute or two while the data volume initialises, so give it a moment before deciding something is wrong.
Success looks like: a login screen with a single field, asking you to paste your dashboard token. Step 6 fetches it.
6. Get your login token
On a Docker install the token is generated on first boot and lives inside the
container's data volume, so it is read from in there. In PowerShell or Git Bash,
from the folder that holds docker-compose.yml:
docker compose exec myagentos sh -c "grep DASHBOARD_API_TOKEN /data/engine/.env"
What it does: prints one line from the container's own environment file.
Success looks like: one line beginning DASHBOARD_API_TOKEN=. Copy
everything after the =, paste it into the login screen, and select Sign in.
You will usually only need this once per browser, so save it somewhere safe.
7. Complete the first-run wizard
Once you are in, open Connect Apps from the sidebar. Fill in the Complete workspace setup card with your name and a line about the work you do, then press Complete bootstrap.
What it does: personalises your agents, replacing the seeded templates with your details. It runs once, and it is required: the agents stay blocked until it is done.
Success looks like: the card clears and the agents become available.
8. Connect your AI provider
Stay on Connect Apps and expand AI Providers. There are two routes and you only need one.
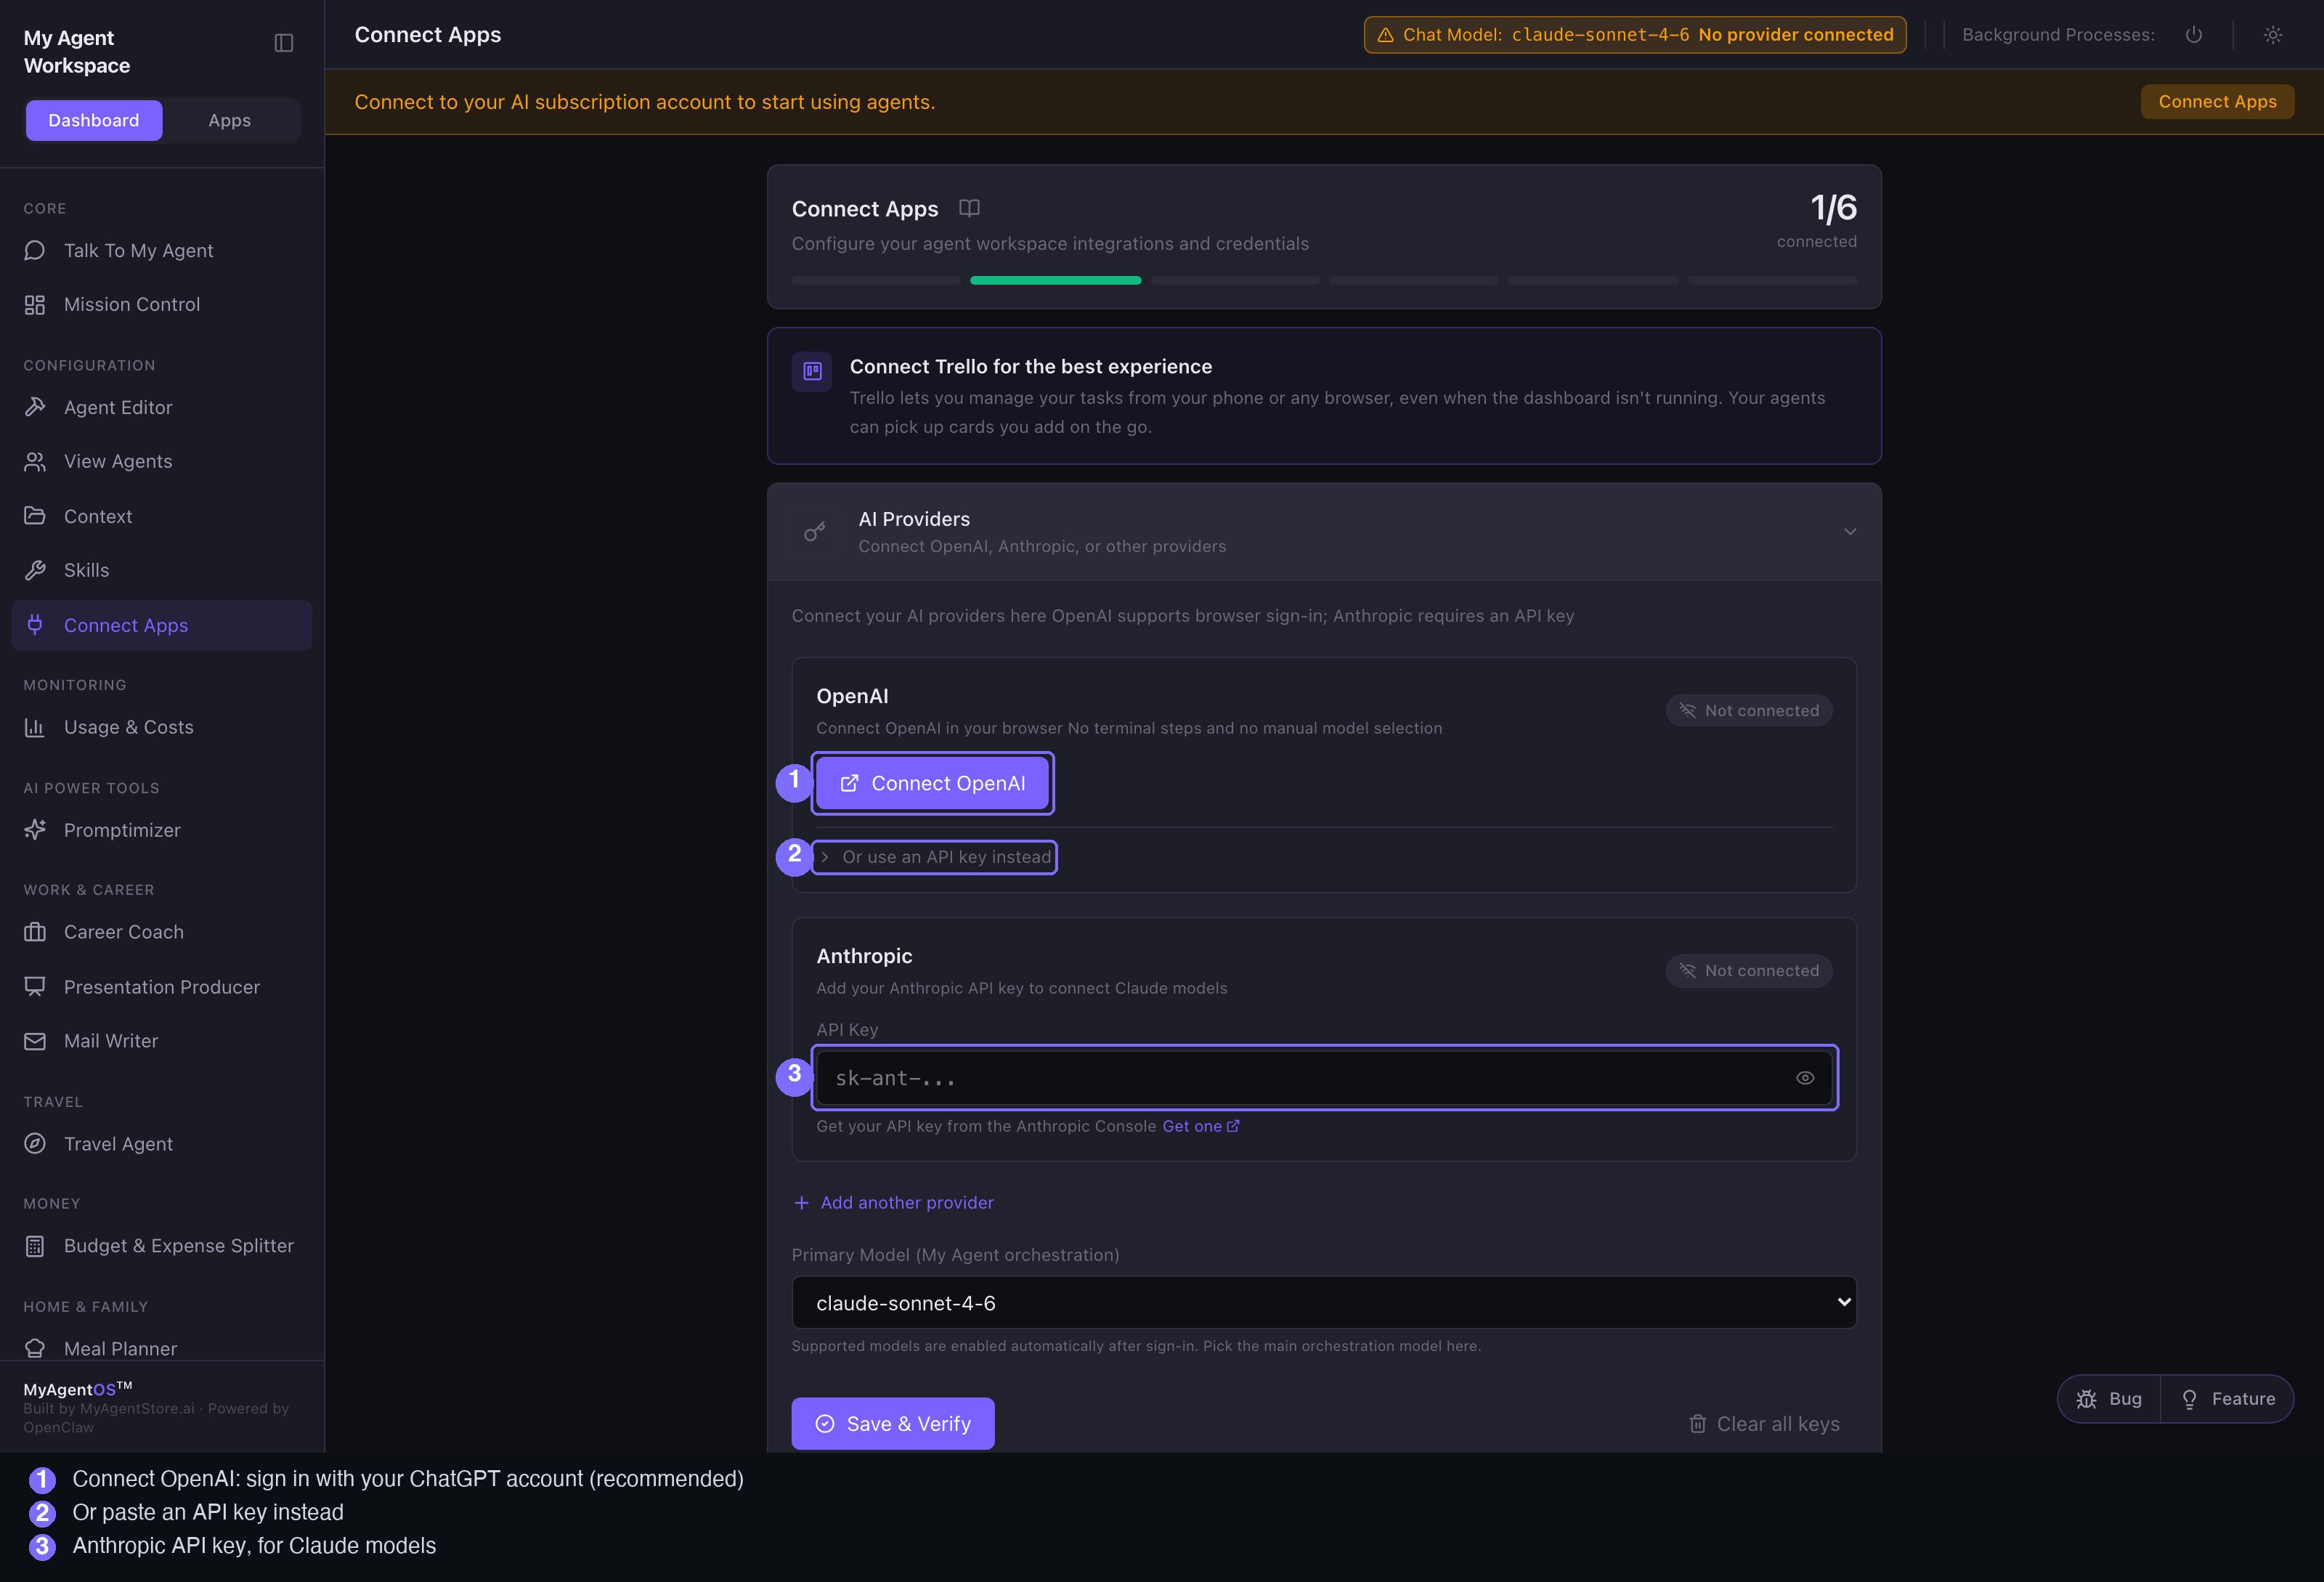
With a ChatGPT subscription. Select Connect OpenAI. Because the product
is running inside a container, the sign-in uses a device code rather than a
browser callback: the dashboard shows a short code and a link to
auth.openai.com/codex/device. Open that link in any browser, on any device,
enter the code, and the container finishes the sign-in on its own. The code is
valid for 15 minutes; if it lapses before you finish, start the connect again and
you will be given a fresh one.
ChatGPT accounts need one setting switched on first: in ChatGPT, go to Settings, then Security, and turn on Enable device code authorization for Codex. Without it the code will not be accepted.
With an API key. Paste your key into the relevant card and select Save & Verify. This works straight away, with no device code and no browser step. Keys are billed per token by the provider, not by us.
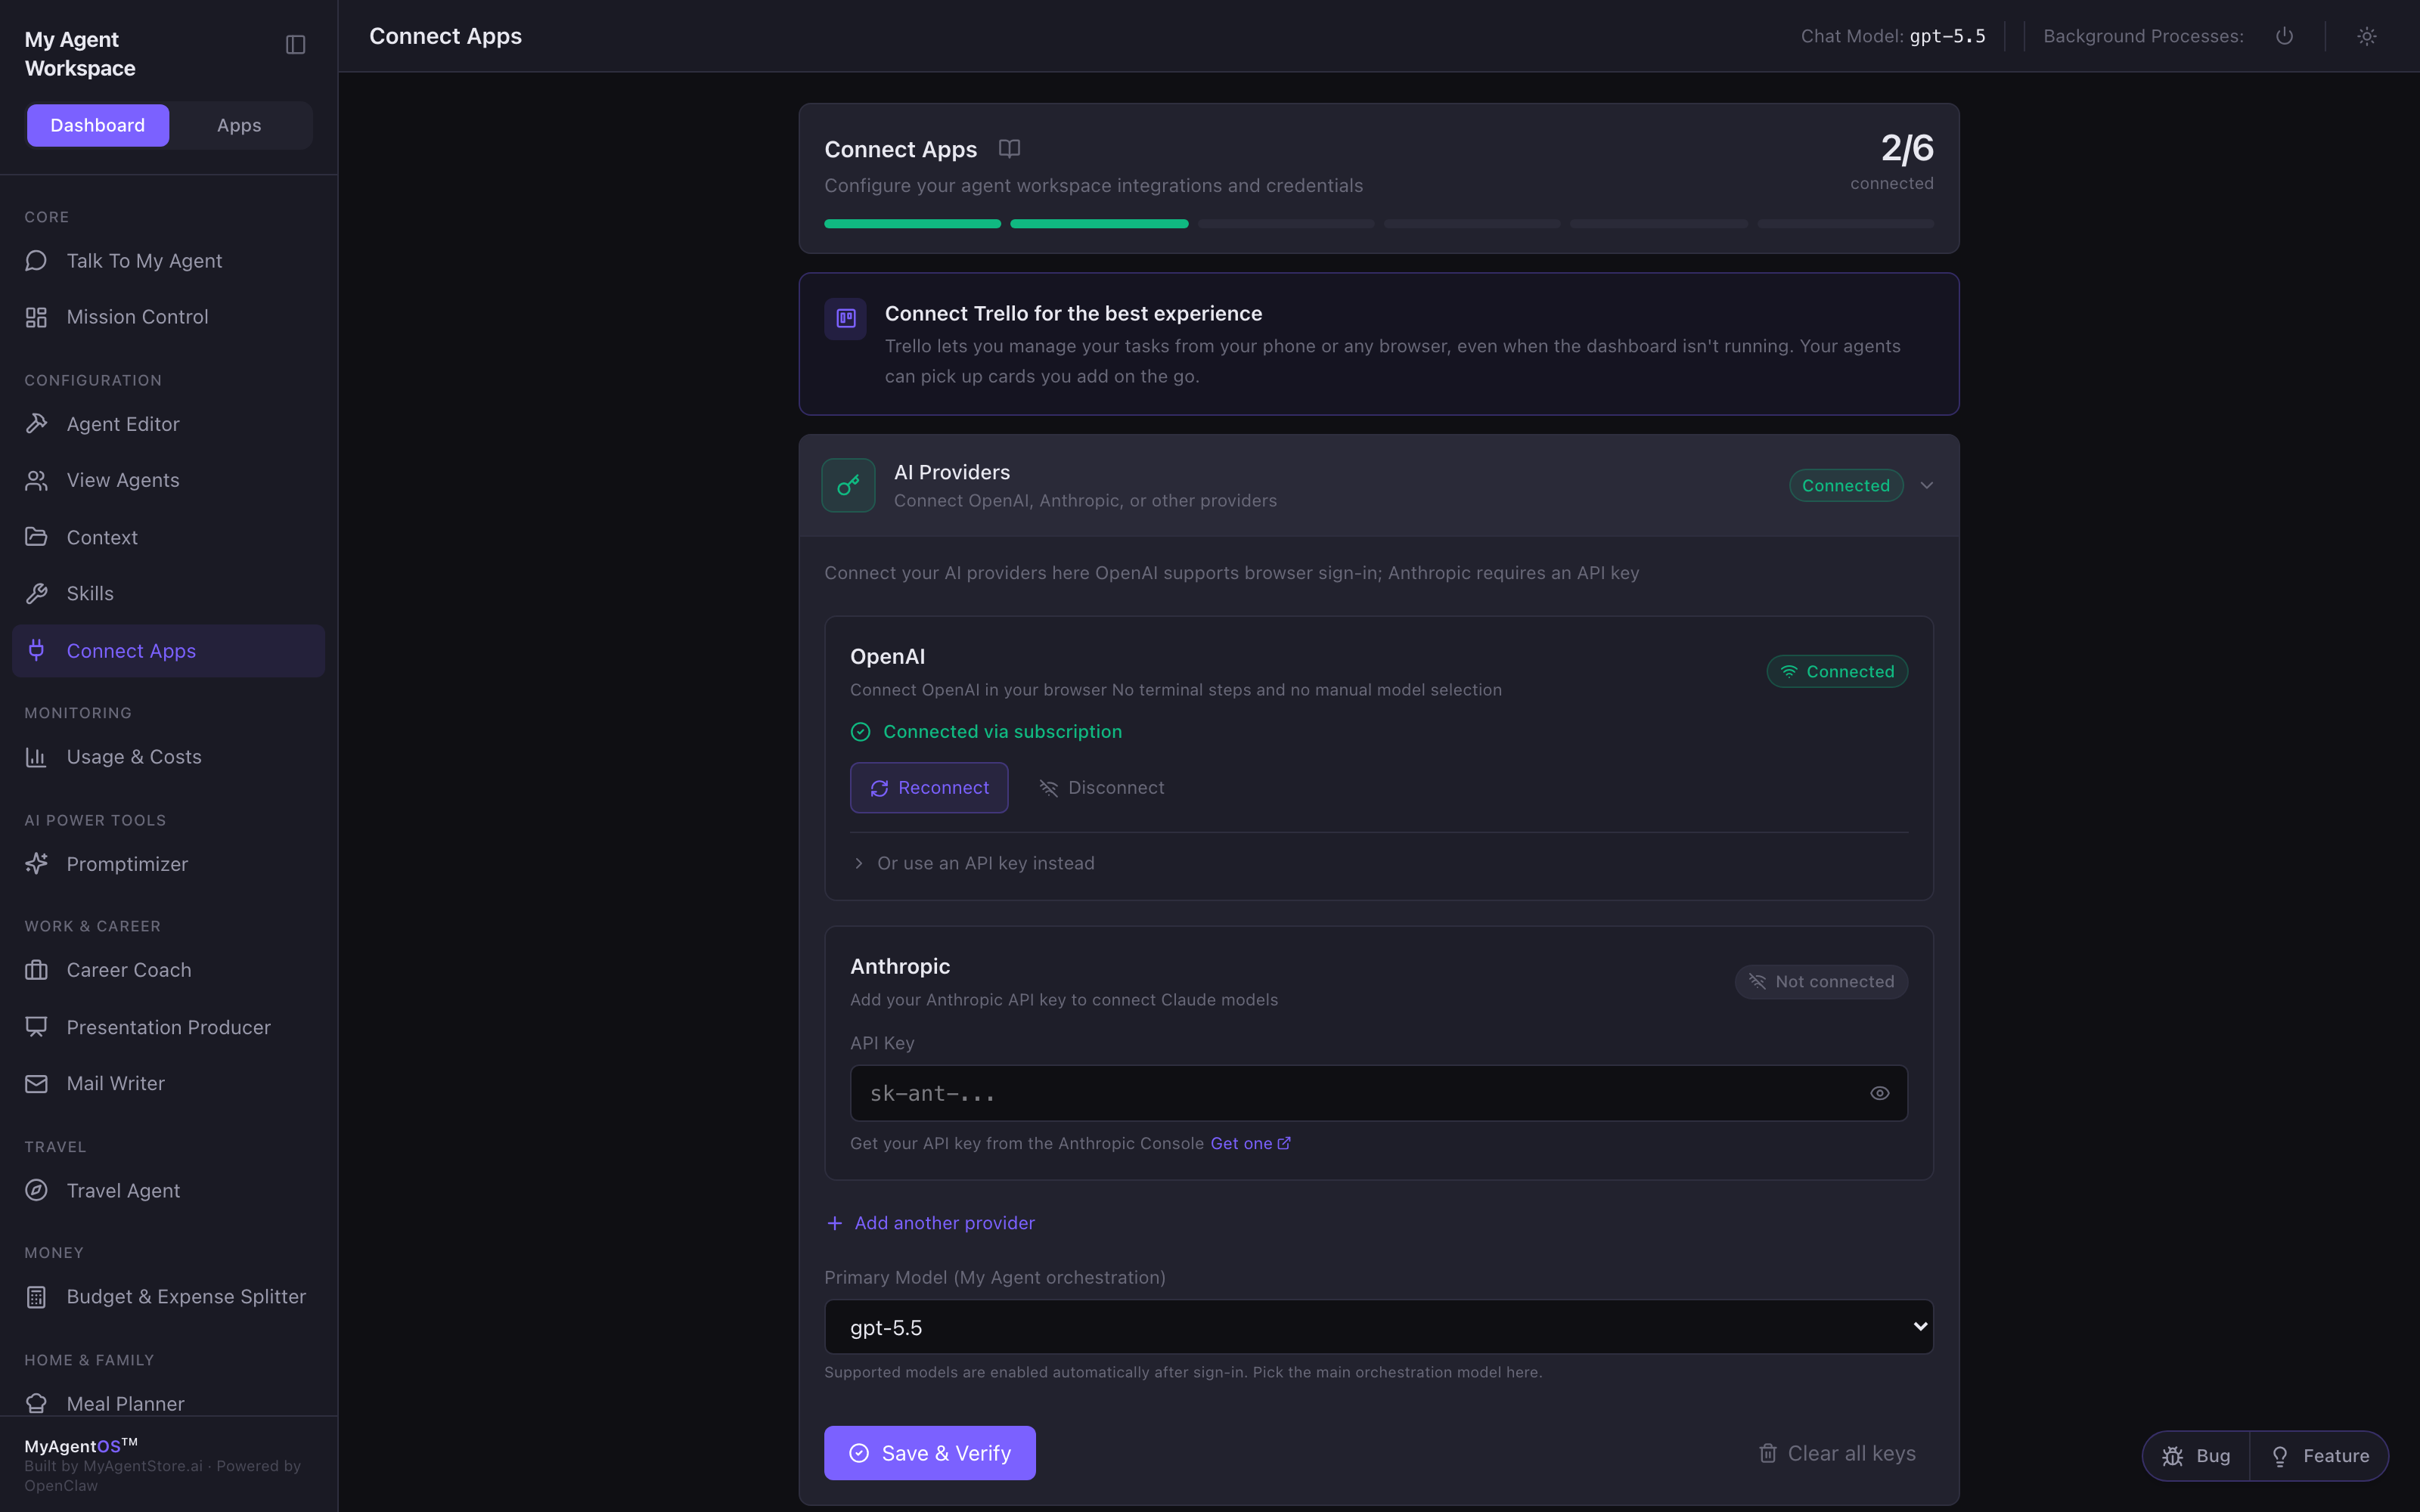
Success looks like: the provider card reads Connected, and the "No provider connected" warning clears from the top bar.
The full walkthrough of every provider, including the other API-key options, is on Connecting your AI.
9. Send your first message
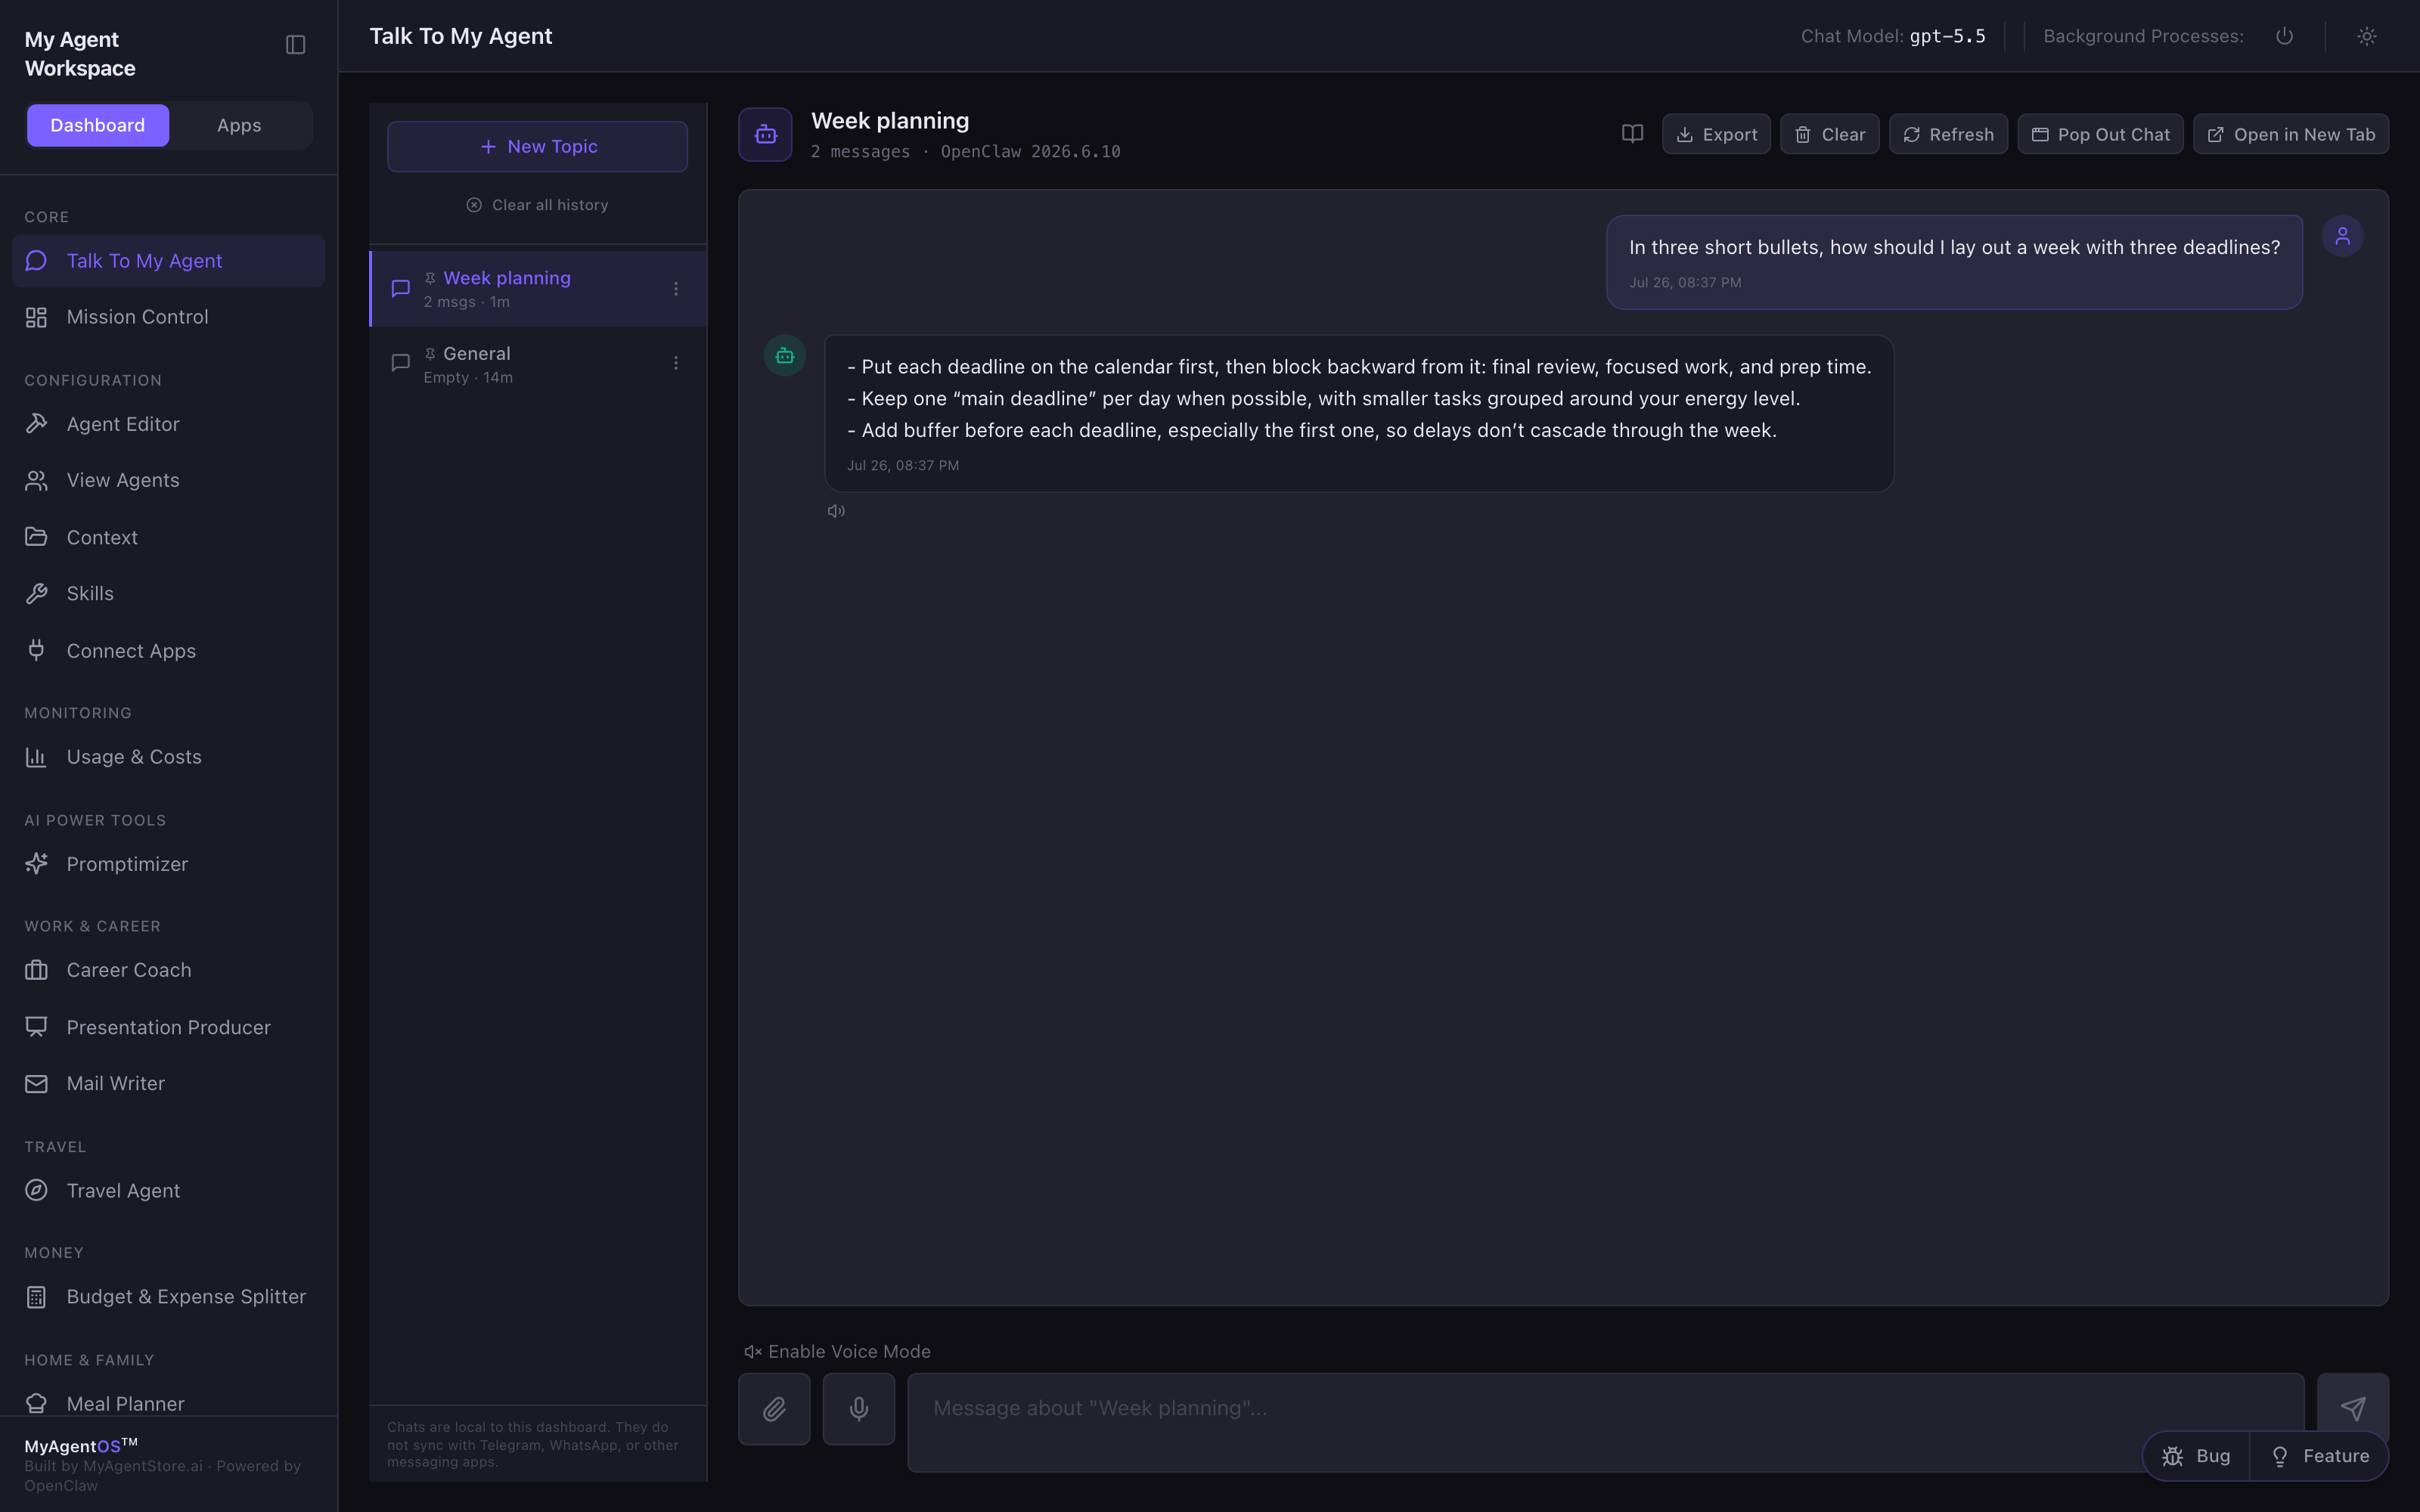
Open Talk To My Agent from the sidebar and ask it something. A short, concrete question is a better first test than a broad one.
Success looks like: a reply comes back in the thread.
That is the whole install. Everything lives in the myagentos-data volume on
your own PC, the dashboard answers only on 127.0.0.1 and only with your token,
and the agents run on the provider account you connected.
How Windows behaves after a reboot
One thing to know before you rely on this machine: after a Windows reboot, MyAgentOS stays down until someone signs in to Windows.
Docker Desktop on Windows is a desktop application, not a background service, so nothing runs until a user session exists. Once you do sign in, Docker Desktop starts, MyAgentOS comes back on its own with no command from you, and your data is intact.
This is how Docker Desktop works on Windows, not data loss and not a setting you can change. If you need a machine that runs MyAgentOS unattended, through reboots, with nobody signing in, use a Linux host instead.
Everyday commands
| What you want | Command |
|---|---|
| See whether it is running | docker ps |
| Stop it | docker compose stop |
| Start it again | docker compose start |
| Restart it | docker compose restart |
| Read the logs | docker compose logs -f |
| Print your token again | docker compose exec myagentos sh -c "grep DASHBOARD_API_TOKEN /data/engine/.env" |
Run all of them from the folder that holds docker-compose.yml.
Hit something this guide does not cover? Tell us what you did and what happened, through Send Feedback on the early-access page or at support@myagentstore.ai.